Shannon Baseband: Pixel 9 Reverse Engineering Shenanigans
2025-07-20
This post outlines several Shannon Baseband reverse engineering techniques and explains why reverse engineering this component is especially difficult on the Google Pixel 9.
Table of Contents
Backstory
My way to start any security research topic is to go through previous research. I believe the most important research on the Shannon Baseband is, in no particular order:
- Breaking Band [1] by Nico Golde and Daniel Komaromy
- A walk with Shannon [2] by Amat Cama
- Emulating Samsung’s Baseband for Security Testing [3] by Grant Hernandez and Marius Muench
These talks helped shape the current state of the Shannon Baseband research field.
Finding baseband vulnerabilities is easy
Before you come at me with pitchforks, let me explain. Crashing the baseband is surprisingly easy — so easy, in fact, that I did it by accident. I won’t go into specifics about the subsystem I was working with, but I will say that it was one I had no prior knowledge of. I relied on publicly available ETSI and 3GPP specifications to understand the message format, connected everything accordingly, and started experimenting with various messages just to observe how the system would respond.
I wasn’t even trying to crash it, but I did. Not only that, but the crash is also reproducible and worked on three different devices (two Google models and one Samsung model.) Can you imagine how many crashes you can get if you actually try?
This isn’t just my experience either. In Grant Hernandez’s talk, he said:
“We found crashes, which is really cool, but then we now realized the main issue with this approach [is that] we couldn’t understand why they had crashed. We were just flipping bits randomly. Not to mention that the phones themselves weren’t giving us the required debugging output to actually figure out what was happening, let alone the impact of what we just found.”
- Grant Hernandez
Let us also note that baseband crash behavior is different from vendor to vendor. On Google devices, the baseband crashes and restarts without the Android OS rebooting. This results in a minidump being generated in logcat. Still nowhere near enough information. On Samsung devices, the baseband crashes and shows a crash screen to allow for dumping. None of these are enough to understand the crash, but they are enough to know that the baseband is vulnerable.
Can we make it disclose more information?
I investigated the possibility of making the baseband disclose more information at runtime. These are the two main things I investigated in that regard:
- Reverse and manipulate the
cbduser-space task (cellularbasebanddaemon) to make it log more information or provide more information than it normally does. - Reverse and manipulate the
cpifkernel-space driver (cellularprocessorinterface) to make it log more information
For the cbd task, through some preliminary reversing, it simply seems like that task does not actually have a lot of information to provide. I recompiled a modified implementation of the cpif driver to understand it more and see if I can make it log more information
By far, the most interesting thing to play around with is the CONFIG_CP_BTL kernel configuration. BTL is the format used by the baseband for logging. It has already been reverse engineered by Grant and his team [4]. I did enable it, but after some time spent there, it seems that something needs to be modified on the baseband side to make it actually send the data over to the application processor.
Of course, I’m unsure of that. To know that for sure, I need to reverse the baseband more.
Just emulate it, they said. It’ll be easy, they said.
FirmWire is a baseband emulation tool. By all means, it is a great tool, but it is not a silver bullet. For my specific use case, it isn’t very helpful. This is for two reasons. The first is that it simply does not work on the Google Pixel 9 modems, which is my target.
The second, more important reason is how FirmWire works. By definition, FirmWire is not actually connected to any real hardware. To combat this, FirmWire offers a clever workaround: injecting a custom baseband task that communicates with other tasks through the queues. I believe this is one of the best ways to go about this problem. However, to understand the data format sent to the queues, reverse engineering is still required.
Simply put, we need one of the following to understand and exploit baseband vulnerabilities:
- Debugging (requires reversing)
- Emulation (requires reversing)
- Reversing (obviously)
Since I’m lazy, I’ll stick to reversing. Whatever gets the job done faster is better.
The severe lack of public research
A big issue regarding (Shannon) baseband research is that changes in the baseband are faster than public research. This is not because changes in the baseband are fast, but because public research is very lacking, to say the least.
For example, in Grant’s talk, he said:
“There had been [a] talk that actually [mentions] these files were encrypted. We didn’t see that. None of our images were encrypted.” - Grant Hernandez
He is talking about the Breaking Band talk, and I see where he is coming from. The publicly documented methods for dumping baseband images and logs no longer seem applicable. For context, the Breaking Band talk was given in 2016, while Grant’s talk was given in 2021. Imagine the most recent public research you can find on a topic being from five years ago.
I faced similar problems using the reversing scripts [5] Grant wrote, which in the end caused me to write my own reversing tool.
The pickle
Well, I already have crashes, but it is virtually impossible to understand and exploit these crashes without reversing. Without effective reverse engineering, even basic vulnerability analysis becomes a guessing game.
Emulation is not a bulletproof solution either, because to reproduce the crashes in an emulated baseband, you need to reverse engineer it enough to know:
- Which task to target
- Which queue to write to
- The exact format in the queue (which might or might not be different from the data sent over the air)
A lot of previous research resorted to “dumping the baseband memory through dial-up commands.” This did not work at all from my experience. On Samsung devices, the dumps did not contain any baseband-related memory or logs. On Google Pixel devices, the dial-up commands are not even supported anymore.
Reversing with style
Grant’s reversing scripts are an amazing starting point, but they are quite old now (supports only old Ghidra versions,) and more importantly, they do not work completely well on my target devices.
On the Galaxy S20FE baseband image, the MPU table (more on that later) was not detected correctly. On the Pixel 9, nothing was detected. Not even the CRCs matched. Worse yet, even after the baseband of a supported phone was loaded, it can take a while for someone who is searching for the first time to find the task list and task entries.
To solve this, I wrote a python script that takes inspiration from the vmlinux-to-elf tool by marin-m. [6] This is by far, one of the most long-lasting and well-tested reversing tools I have ever seen. Therefore, I wrote a similar tool for the Shannon Baseband, called radio-to-elf. [7]
radio-to-elf is a Python script that converts a baseband image into an ELF file suitable for any reversing tool. It does this by:
- Extracting a
modem.binfrom aradio.img(if applicable) - Parsing the TOC header and verifying the CRCs
- Extracting and parsing the MPU table
- Extracting and parsing the scatterload table
- Extracting the task list and task entries
- Turning the baseband image into a symbolized ELF file for reversing
The main benefit of this approach is that now only one type of compatibility mismatch can happen, which is regarding the baseband image format. This is much better than having to deal with compatibility issues regarding both the baseband image format and the reversing tool(s).
One extra feature of radio-to-elf is that it can also extract the modem.bin from a google pixel radio.img file. This has never been done before. Even in the talk by Google Project Zero How to Hack Shannon Baseband (from a Phone) [8] given by Natalie Silvanovich, the baseband was dumped from memory using dial-up commands which don’t work anymore.
Enough ranting. Time to check out the baseband format.
The MPU table format
The MPU table is a structure in Shannon Baseband images that outlines the memory access permissions for different regions of memory. This is extremely useful for distinguishing code from data during reversing and exploitation.
This is a dump of the first 0x100 bytes of an example MPU table:
000000: 00 00 00 00 00 00 00 00 1e 00 00 00 08 00 00 00 ................
000010: 00 06 00 00 00 00 00 00 00 00 00 00 00 00 00 00 ................
000020: 00 00 00 00 01 00 00 00 01 00 00 00 00 00 20 40 ...............@
000030: 28 00 00 00 08 00 00 00 00 06 00 00 00 10 00 00 (...............
000040: 00 00 00 00 02 00 00 00 01 00 00 00 01 00 00 00 ................
000050: 02 00 00 00 00 00 40 40 28 00 00 00 08 00 00 00 ......@@(.......
000060: 00 06 00 00 00 10 00 00 00 00 00 00 02 00 00 00 ................
000070: 01 00 00 00 01 00 00 00 03 00 00 00 00 00 c0 49 ...............I
000080: 26 00 00 00 08 00 00 00 00 03 00 00 00 10 00 00 &...............
000090: 00 00 00 00 00 00 00 00 00 00 00 00 01 00 00 00 ................
0000a0: 04 00 00 00 00 00 d0 49 26 00 00 00 08 00 00 00 .......I&.......
0000b0: 00 06 00 00 00 00 00 00 00 00 00 00 02 00 00 00 ................
0000c0: 01 00 00 00 01 00 00 00 05 00 00 00 00 00 e0 49 ...............I
0000d0: 26 00 00 00 08 00 00 00 00 06 00 00 00 00 00 00 &...............
0000e0: 00 00 00 00 02 00 00 00 01 00 00 00 01 00 00 00 ................
0000f0: 06 00 00 00 00 00 f0 49 26 00 00 00 08 00 00 00 .......I&.......
Here is a better breakdown of the first MPU slot:
| Field | Range | Value |
|---|---|---|
| Slot ID | 0x0-0x3 |
0x0 |
| Base Address | 0x4-0x8 |
0x00000000 |
MPU_RASR |
0x8-0x28 |
0x0608001f |
MPU_RASR is short for “Memory Protection Unit Region Attribute and Size Register.” It is a register that defines the attributes and size of a memory region in the MPU. The bits in this register are used to control access permissions, cacheability, and other attributes of the memory region.
How did we calculate it? If we assume the MPU slot to be a uint32_t items[10];, then MPU_RASR = ((items[2] | items[9]) | (items[3] | items[4] | items[5] | items[6] | items[7] | items[8]) << 16). Don’t ask me why it is formatted like that because I have no idea. This is just how it is.
With the help of the ARM developer documentation, [9] the MPU_RASR register is structured as follows:
| Bits | Name | Function |
|---|---|---|
[31:16] |
ATTRS | The MPU Region Attribute field. This field has the following subfields, defined in Region attribute control: - XN ( MPU_RASR[28])- AP[2:0] ( MPU_RASR[26:24])- TEX[2:0] ( MPU_RASR[21:19])- S ( MPU_RASR[18])- C ( MPU_RASR[17])- B ( MPU_RASR[16]) |
[15:8] |
SRD | Subregion Disable. For regions of 256 bytes or larger, each bit of this field controls whether one of the eight equal subregions is enabled. See Memory region subregions: - 0: subregion enabled - 1: subregion disabled |
[7:6] |
- | Reserved |
[5:1] |
SIZE | Indicates the region size. The permitted values for SIZE are 7-31, i.e., 0b00111–0b11111.The associated region size, in bytes, is 2^(SIZE+1).SIZE values less than 7 are reserved, as the smallest supported region size is 256 bytes. |
[0] |
ENABLE | Enables this region: - 0: When the MPU is enabled, this region is disabled. - 1: When the MPU is enabled, this region is enabled. Enabling a region has no effect unless the MPU_CTRL.ENABLE bit is also set to 1, to enable the MPU. |
Grant’s pattern matching did not work for me on newer basebands, so I used a different pattern to match the MPU table. The pattern I used is:
b"".join(
    [
        # the entry slot ID of x
        struct.pack("<I", x) +
        # a start address of zero for the first slot, and any address for the rest
        (b"[\\x00]{4}" if x == 0 else b".{4}") +
        # 7 arbitrary 4-byte values
        b".{28}"
        # the enable boolean of 1
        b"\\x01\\x00\\x00\\x00"
        # For 4 slots (this could be adjusted)
        for x in range(4)
    ]
)
The main difference is that Grant’s pattern used a fixed known address for the second slot, while this pattern doesn’t.
Scatterload format
Scatterload is a link-time loading mechanism used in Shannon Baseband images. It enables fine-grained control over how chunks of memory are loaded. Unlike the MPU table, scatterloading operates at byte-level granularity rather than page-level. As a side-note, scatterloading functions are super-useful ROP gadgets.
There are multiple versions of scatterloading functions, but the structure is one and the same. Here is an example dump of a scatterload table:
000000: 20 24 98 42 00 00 00 00 00 00 00 00 80 ae 8d 42 .$.B...........B
000010: 00 00 00 00 20 24 98 42 00 00 00 00 80 ae 8d 42 .....$.B.......B
000020: 20 34 98 42 20 34 98 42 f4 8e 23 00 1c af 8d 42 .4.B.4.B..#....B
000030: e0 26 88 43 40 00 d0 47 50 49 0c 00 1c af 8d 42 .&.C@..GPI.....B
000040: 30 70 94 43 90 49 dc 47 30 89 22 00 a8 ae 8d 42 0p.C.I.G0."....B
000050: c8 e1 a1 43 00 00 00 48 00 00 10 01 a8 ae 8d 42 ...C...H.......B
000060: ec 03 a4 43 00 00 c0 49 30 30 00 00 1c af 8d 42 ...C...I00.....B
000070: 1c 34 a4 43 00 00 d0 49 f4 ae 0b 00 1c af 8d 42 .4.C...I.......B
000080: 10 e3 af 43 00 00 b0 4a fc 00 00 00 1c af 8d 42 ...C...J.......B
000090: 0c e4 af 43 00 00 d0 4c 24 43 01 00 a8 ae 8d 42 ...C...L$C.....B
0000a0: 98 e6 af 43 00 00 50 4c 20 05 53 00 a8 ae 8d 42 ...C..PL..S....B
0000b0: e8 64 c0 43 00 00 80 52 00 00 00 04 a8 ae 8d 42 .d.C...R.......B
0000c0: 10 e3 af 43 00 00 70 4a a4 00 00 00 44 af 8d 42 ...C..pJ....D..B
0000d0: 10 e3 af 43 00 01 70 4a b4 02 00 00 44 af 8d 42 ...C..pJ....D..B
0000e0: 10 e3 af 43 00 09 70 4a 14 00 00 00 44 af 8d 42 ...C..pJ....D..B
0000f0: 10 e3 af 43 80 09 70 4a 8c 24 00 00 44 af 8d 42 ...C..pJ.$..D..B
000100: 10 e3 af 43 80 39 70 4a 84 06 00 00 44 af 8d 42 ...C.9pJ....D..B
000110: 10 e3 af 43 80 41 70 4a 04 00 00 00 44 af 8d 42 ...C.ApJ....D..B
000120: 10 e3 af 43 00 42 70 4a 00 07 00 00 44 af 8d 42 ...C.BpJ....D..B
000130: 10 e3 af 43 00 4a 70 4a 6c 2f 00 00 44 af 8d 42 ...C.JpJl/..D..B
000140: 10 e3 af 43 00 0a 71 4a 60 9a 01 00 44 af 8d 42 ...C..qJ`...D..B
000150: 10 e3 af 43 00 aa 72 4a 14 23 01 00 44 af 8d 42 ...C..rJ.#..D..B
000160: 10 e3 af 43 00 aa 75 4a fc c2 20 00 44 af 8d 42 ...C..uJ....D..B
000170: 10 e3 af 43 00 00 98 4a 48 64 17 00 44 af 8d 42 ...C...JHd..D..B
000180: 0c e4 af 43 fc 00 b0 4a dc c9 84 00 44 af 8d 42 ...C...J....D..B
000190: 0c e4 af 43 00 00 40 4b a0 45 04 01 44 af 8d 42 ...C..@K.E..D..B
0001a0: 98 e6 af 43 24 43 d1 4c 1c 99 2a 00 44 af 8d 42 ...C$C.L..*.D..B
0001b0: 4c 8d b0 43 20 05 a3 4c 00 ef 0c 00 44 af 8d 42 L..C...L....D..B
0001c0: 4c 8d b0 43 00 10 70 4d 20 34 00 00 44 af 8d 42 L..C..pM.4..D..B
0001d0: 4c 8d b0 43 00 80 71 4d 98 09 00 00 44 af 8d 42 L..C..qM....D..B
0001e0: 4c 8d b0 43 00 90 71 4d c8 19 00 00 44 af 8d 42 L..C..qM....D..B
0001f0: 4c 8d b0 43 00 c0 71 4d 58 00 00 00 44 af 8d 42 L..C..qMX...D..B
000200: 4c 8d b0 43 00 00 72 4d a8 ad 04 00 44 af 8d 42 L..C..rM....D..B
Instead of just talking about how to reach this table from a scatterload function, here is an outline of the references and the contents of the scatterload table:

Note that each element in the scatterload table is an unsigned 32-bit integer, and an entry contains only 4 elements, making this structure quite straightforward. Basically all the scatterload function does is go through the list of function pointers and call them with the specified arguments.
Task control block format
None of the reversing tools currently provide a way to have a list of tasks and be able to start reversing an appropriate task accordingly. It took me a bit to find the tasks that are relevant to the subsystem I was interested in. To save myself and future researchers this hassle, I also added support to automatically extract the task list and task entries from the baseband image.
The reason this makes such a difference is because now any resource referencing a vulnerability can simply showcase the task name and the call stack leading to the vulnerability, making it much easier for anyone to go through the code path and understand it.
Here is how that is structured:
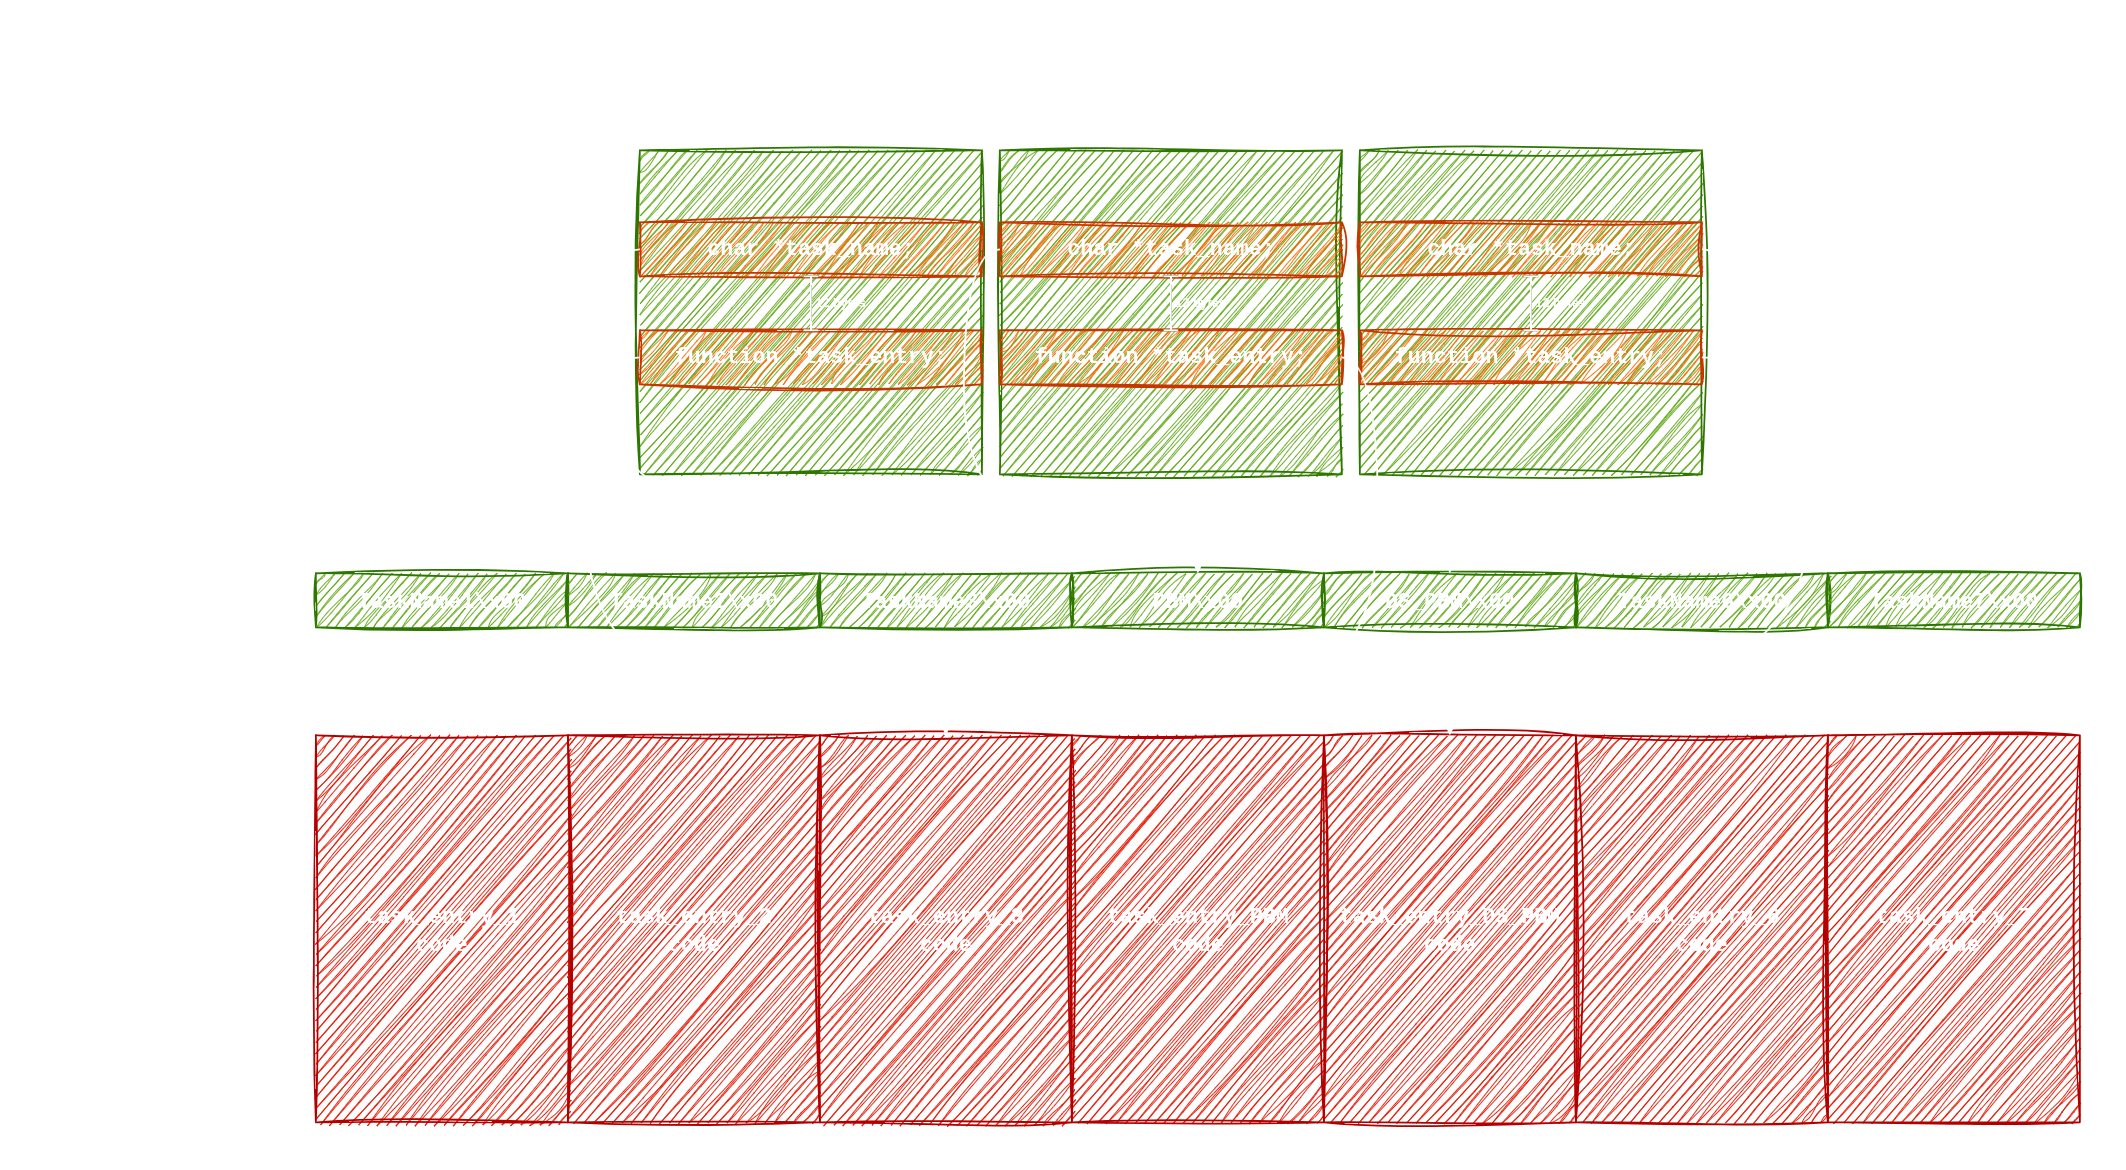
In order to find the task entries, we simply:
- Search for the task names
- Calculate their runtime addresses
- Search for those addresses in the baseband image to find the name pointers
- Get the task entries’ addresses by offsetting the name pointers
All of those addresses are then symbolized in the generated ELF file, making it easy to find them in Ghidra or any other reversing tool.
Extracting the modem.bin from a Pixel radio.img
Before I go into how it’s done, let me explain why I did it.
First, I extracted the modem.bin from a rooted Pixel 9 device. This modem.bin didn’t match any modem images I’d seen before. This led me to believe the image was corrupt due to how different it appeared. Here are the differences:
- The TOC header’s CRCs did not match the expected values
- The MPU table was nowhere to be found
- The scatterload table was nowhere to be found
- The task names were present, but the TCBs were missing
That was enough to convince me the modem.bin was incomplete or malformed — and that’s how we ended up here. But I digress.
The extraction is a three-step process:
| In | Format | The Catch | Out |
|---|---|---|---|
radio.img |
FastBootPacK | It uses FBPK version 1, not version 2 | modem.img |
modem.img |
tar Archive |
The owner UID field is not standard format | modem.ext4 |
modem.ext4 |
ext4 Partition |
The superblock is not at offset 1024, it is at the start of the file | modem.bin |
This is different from previous baseband images, where the extraction method was much simpler as outlined by Alexander Pick. [10] There was no tar middle step, and the modem.img could be mounted directly as an ext4 partition.
With every single packing step, there was always some deviation from the expected format. This was, of course, a pain to figure out.
Unpacking the radio.img
The first step is to extract the modem.img from the radio.img. The fastboot packing version is a bit different from the standard one, so we need to account for that. Here is an example dump of the first 0x100 bytes of a radio.img file:
000000: 46 42 50 4b 01 00 00 00 67 35 34 30 30 63 2d 32 FBPK....g5400c-2
000010: 34 31 32 30 35 2d 32 35 30 31 32 37 2d 4d 2d 31 41205-250127-M-1
000020: 32 39 37 31 37 31 36 00 00 00 00 00 00 00 00 00 2971716.........
000030: 00 00 00 00 00 00 00 00 00 00 00 00 00 00 00 00 ................
000040: 00 00 00 00 00 00 00 00 00 00 00 00 01 00 00 00 ................
000050: 8c 10 6f 0b 01 00 00 00 6d 6f 64 65 6d 00 00 00 ..o.....modem...
000060: 00 00 00 00 00 00 00 00 00 00 00 00 00 00 00 00 ................
000070: 00 00 00 00 00 00 00 00 00 00 00 00 00 10 6f 0b ..............o.
000080: 00 00 00 00 90 10 6f 0b c2 fb 94 db 67 35 34 30 ......o.....g540
000090: 30 63 2d 32 34 31 32 30 35 2d 32 35 30 31 32 37 0c-241205-250127
0000a0: 2d 42 2d 31 32 39 37 31 37 31 36 00 00 00 00 00 -B-12971716.....
0000b0: 00 00 00 00 00 00 00 00 00 00 00 00 00 00 00 00 ................
0000c0: 00 00 00 00 00 00 00 00 00 00 00 00 00 00 00 00 ................
0000d0: 00 00 00 00 00 00 00 00 00 00 00 00 00 00 00 00 ................
0000e0: 00 00 00 00 00 00 00 00 00 00 00 00 00 00 00 00 ................
0000f0: 30 30 30 30 36 36 34 00 80 00 00 00 15 fe 9a b2 0000664.........
The version number is right after the FBPK magic, at offset 0x4. As outlined by Alexander Pick, the image can be unpacked using the fbpacktool provided by CalyxOS. [11] This is an updated version of the original tool provided by Google’s Android Binary Transparency project. [12]
With all due respect, binary transparency my ass.
Unpacking the modem.img
The modem.img is a tar file, but it’s just slightly modified — enough to make you question if it is actually a normal tar file. Here is a hexdump of the first 0x200 bytes:
000000: 67 35 34 30 30 63 2d 32 34 31 32 30 35 2d 32 35 g5400c-241205-25
000010: 30 31 32 37 2d 42 2d 31 32 39 37 31 37 31 36 00 0127-B-12971716.
000020: 00 00 00 00 00 00 00 00 00 00 00 00 00 00 00 00 ................
000030: 00 00 00 00 00 00 00 00 00 00 00 00 00 00 00 00 ................
000040: 00 00 00 00 00 00 00 00 00 00 00 00 00 00 00 00 ................
000050: 00 00 00 00 00 00 00 00 00 00 00 00 00 00 00 00 ................
000060: 00 00 00 00 30 30 30 30 36 36 34 00 80 00 00 00 ....0000664.....
000070: 15 fe 9a b2 30 30 31 31 36 31 30 00 30 30 30 30 ....0011610.0000
000080: 30 30 30 30 30 30 30 00 31 34 37 34 35 37 34 36 0000000.14745746
000090: 36 33 31 00 30 32 30 34 35 36 00 20 30 00 00 00 631.020456..0...
0000a0: 00 00 00 00 00 00 00 00 00 00 00 00 00 00 00 00 ................
0000b0: 00 00 00 00 00 00 00 00 00 00 00 00 00 00 00 00 ................
0000c0: 00 00 00 00 00 00 00 00 00 00 00 00 00 00 00 00 ................
0000d0: 00 00 00 00 00 00 00 00 00 00 00 00 00 00 00 00 ................
0000e0: 00 00 00 00 00 00 00 00 00 00 00 00 00 00 00 00 ................
0000f0: 00 00 00 00 00 00 00 00 00 00 00 00 00 00 00 00 ................
000100: 00 75 73 74 61 72 20 20 00 61 6e 64 72 6f 69 64 .ustar...android
000110: 2d 62 75 69 6c 64 2d 61 6e 64 72 6f 69 64 2d 66 -build-android-f
000120: 69 72 6d 77 61 72 65 2d 00 65 6e 67 00 00 00 00 irmware-.eng....
000130: 00 00 00 00 00 00 00 00 00 00 00 00 00 00 00 00 ................
000140: 00 00 00 00 00 00 00 00 00 00 00 00 00 00 00 00 ................
000150: 00 00 00 00 00 00 00 00 00 00 00 00 00 00 00 00 ................
000160: 00 00 00 00 00 00 00 00 00 00 00 00 00 00 00 00 ................
000170: 00 00 00 00 00 00 00 00 00 00 00 00 00 00 00 00 ................
000180: 00 00 00 00 00 00 00 00 00 00 00 00 00 00 00 00 ................
000190: 00 00 00 00 00 00 00 00 00 00 00 00 00 00 00 00 ................
0001a0: 00 00 00 00 00 00 00 00 00 00 00 00 00 00 00 00 ................
0001b0: 00 00 00 00 00 00 00 00 00 00 00 00 00 00 00 00 ................
0001c0: 00 00 00 00 00 00 00 00 00 00 00 00 00 00 00 00 ................
0001d0: 00 00 00 00 00 00 00 00 00 00 00 00 00 00 00 00 ................
0001e0: 00 00 00 00 00 00 00 00 00 00 00 00 00 00 00 00 ................
0001f0: 00 00 00 00 00 00 00 00 00 00 00 00 00 00 00 00 ................
Fun fact, the extended tar file format magic ustar is at offset 0x101, not at the beginning of the file. The main change is that the owner UID field at offset 0x6C is not in the standard format. [13][14] Weirdly enough, tar file header elements are strings of the octal representation of the value. The version in Pixel 9 phones, however, only breaks this rule for the owner UID field (not even for the group UID field.) Just the owner UID field. Like, why?
Regardless, it can be extracted like a normal tar file.
Unpacking the modem.ext4
This step took me the longest to figure out. The modem.ext4 file is not a standard ext4 partition. It is a modified ext4 partition that has the superblock at the start of the file, not at offset 1024 as expected. This is why it was not recognized as an ext4 partition using standard reversing tools like file or binwalk. Here is a hexdump of the first 0x100 bytes of the modem.ext4 file:
000000: 00 28 00 00 f0 b6 00 00 00 00 00 00 ac 00 00 00 .(..............
000010: ac 27 00 00 00 00 00 00 02 00 00 00 02 00 00 00 .'..............
000020: 00 80 00 00 00 80 00 00 00 14 00 00 00 00 00 00 ................
000030: 99 cd 97 67 00 00 ff ff 53 ef 01 00 02 00 00 00 ...g....S.......
000040: 98 cd 97 67 00 00 00 00 00 00 00 00 01 00 00 00 ...g............
000050: 00 00 00 00 0b 00 00 00 80 00 00 00 20 00 00 00 ................
000060: 42 02 00 00 31 00 00 00 de 68 65 bd 85 b5 44 2e B...1....he...D.
000070: 88 76 d4 03 1e 65 d8 77 50 49 58 45 4c 4d 4f 44 .v...e.wPIXELMOD
000080: 45 4d 00 00 00 00 00 00 00 00 00 00 00 00 00 00 EM..............
000090: 00 00 00 00 00 00 00 00 00 00 00 00 00 00 00 00 ................
0000a0: 00 00 00 00 00 00 00 00 00 00 00 00 00 00 00 00 ................
0000b0: 00 00 00 00 00 00 00 00 00 00 00 00 00 00 00 00 ................
0000c0: 00 00 00 00 00 00 00 00 00 00 00 00 00 00 00 00 ................
0000d0: 00 00 00 00 00 00 00 00 00 00 00 00 00 00 00 00 ................
0000e0: 00 00 00 00 00 00 00 00 00 00 00 00 f9 e6 31 5d ..............1]
0000f0: d7 34 42 48 83 91 26 38 df 68 da 44 01 00 00 00 .4BH..&8.h.D....
The magic of an ext4 superblock is 0xEF53, which is at offset 0x38 [15] from the start of the superblock. In a normal ext4 partition, the superblock is at offset 0x400 (1024 bytes) from the start of the partition. To turn it into a normal mountable ext4 partition, we need to move the superblock to offset 0x400 and then pad the first 1024 bytes with zeros.
Now it can be mounted like a normal ext4 image.
Pixel 9 baseband updates
The Google Pixel 9 baseband is a bit different from the previous basebands. So different, in fact, that no reversing scripts currently support it. Not even the CRCs match. Let’s discuss how different it is, shall we?
Headers
Here are headers parsed from the modem.bin of a Samsung device:
TocHeaderInfo(name='TOC', file_offset=0x00000000, load_address=0x40008000, size=0x00000410, crc=0x00000000, entry_id=6)
TocHeaderInfo(name='BOOT', file_offset=0x00000420, load_address=0x40000000, size=0x00003ab4, crc=0x8e5cad14, entry_id=1)
TocHeaderInfo(name='MAIN', file_offset=0x00003ee0, load_address=0x40010000, size=0x03c76f04, crc=0xf7e860e4, entry_id=2)
TocHeaderInfo(name='VSS', file_offset=0x03c7ae00, load_address=0x4d000000, size=0x00550494, crc=0x9a90150a, entry_id=3)
TocHeaderInfo(name='NV', file_offset=0x00000000, load_address=0x49a00000, size=0x00100000, crc=0x00000000, entry_id=4)
TocHeaderInfo(name='OFFSET', file_offset=0x00080000, load_address=0x00000000, size=0x00080000, crc=0x00000000, entry_id=5)
And here are headers parsed from the radio.img of a Pixel 9 device:
TocHeaderInfo(name='TOC', file_offset=0x00000000, load_address=0x00000000, size=0x00000410, crc=0x00000000, entry_id=10)
TocHeaderInfo(name='BOOT', file_offset=0x00000410, load_address=0x00000000, size=0x00021c00, crc=0x037fe779, entry_id=1)
TocHeaderInfo(name='PSP', file_offset=0x00022010, load_address=0x12b80000, size=0x0003d210, crc=0x7c4d2a1e, entry_id=2)
TocHeaderInfo(name='MAIN', file_offset=0x0005f220, load_address=0x40010000, size=0x04e4bf78, crc=0x7c93db29, entry_id=3)
TocHeaderInfo(name='APM', file_offset=0x04eab198, load_address=0x02030000, size=0x0000b848, crc=0xc499f34d, entry_id=4)
TocHeaderInfo(name='VSS', file_offset=0x04eb69e0, load_address=0x4f900000, size=0x00520214, crc=0xde39fb73, entry_id=5)
TocHeaderInfo(name='DBGCORE', file_offset=0x053d6bf4, load_address=0x11b00000, size=0x00001590, crc=0xfac85104, entry_id=6)
TocHeaderInfo(name='RF_CFG', file_offset=0x00000000, load_address=0x4da00000, size=0x00327174, crc=0x00000000, entry_id=7)
TocHeaderInfo(name='NV_NORM', file_offset=0x00000000, load_address=0x4d200000, size=0x00080000, crc=0x00000000, entry_id=8)
TocHeaderInfo(name='NV_PROT', file_offset=0x00000000, load_address=0x4d280000, size=0x00080000, crc=0x00000000, entry_id=9)
The Samsung TOC headers are TOC, BOOT, MAIN, VSS, NV, and OFFSET while the Pixel TOC headers are TOC, BOOT, PSP, MAIN, APM, VSS, DBGCORE, RF_CFG, NV_NORM, and NV_PROT. The most interesting additions in my opinion are APM and PSP, which seem to stand for “Application Processor Module” and “Platform Security Processor”. At this point, though, that’s just a wild guess.
These additions might or might not be related to the recent hardening of the Google Pixel 9 baseband. [16]
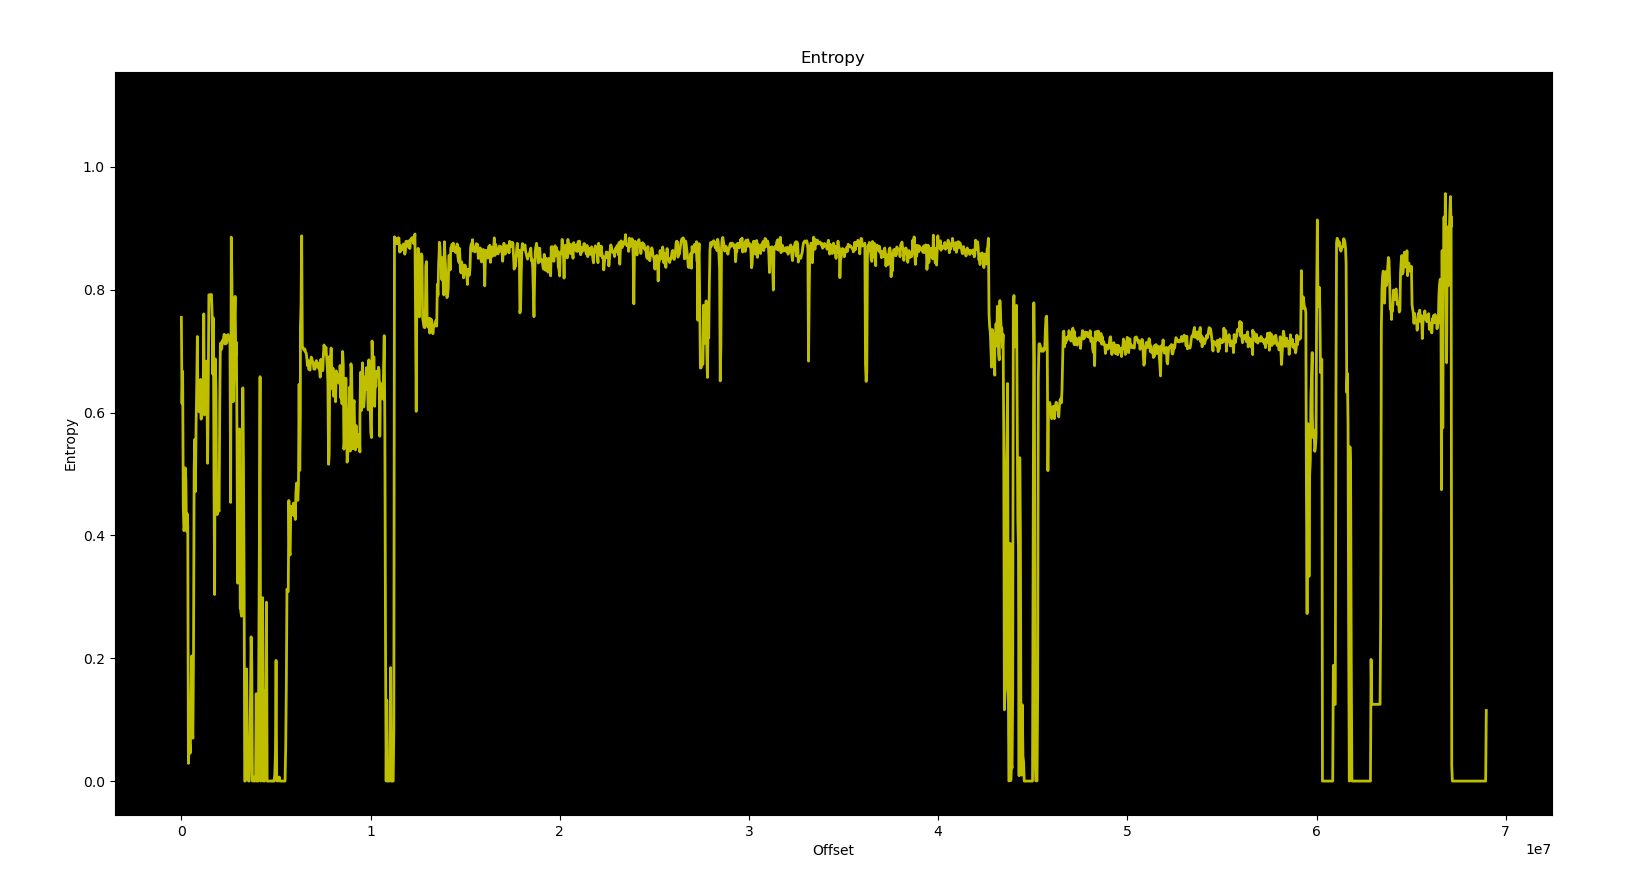
Entropy
With all of the scripts unable to match any of the known baseband structures, it would make sense to assume that most of the data we’re looking for must be encrypted or compressed in some way, right? Well, that doesn’t seem to be the case at all. A very simple check of the binary entropy debunks that assumption.
For reference, here is the entropy graph of a Samsung baseband image where the reverse engineering scripts perform reliably:
And here is the entropy of a Google Pixel 9 baseband image where reverse engineering strategies are not publicly known:
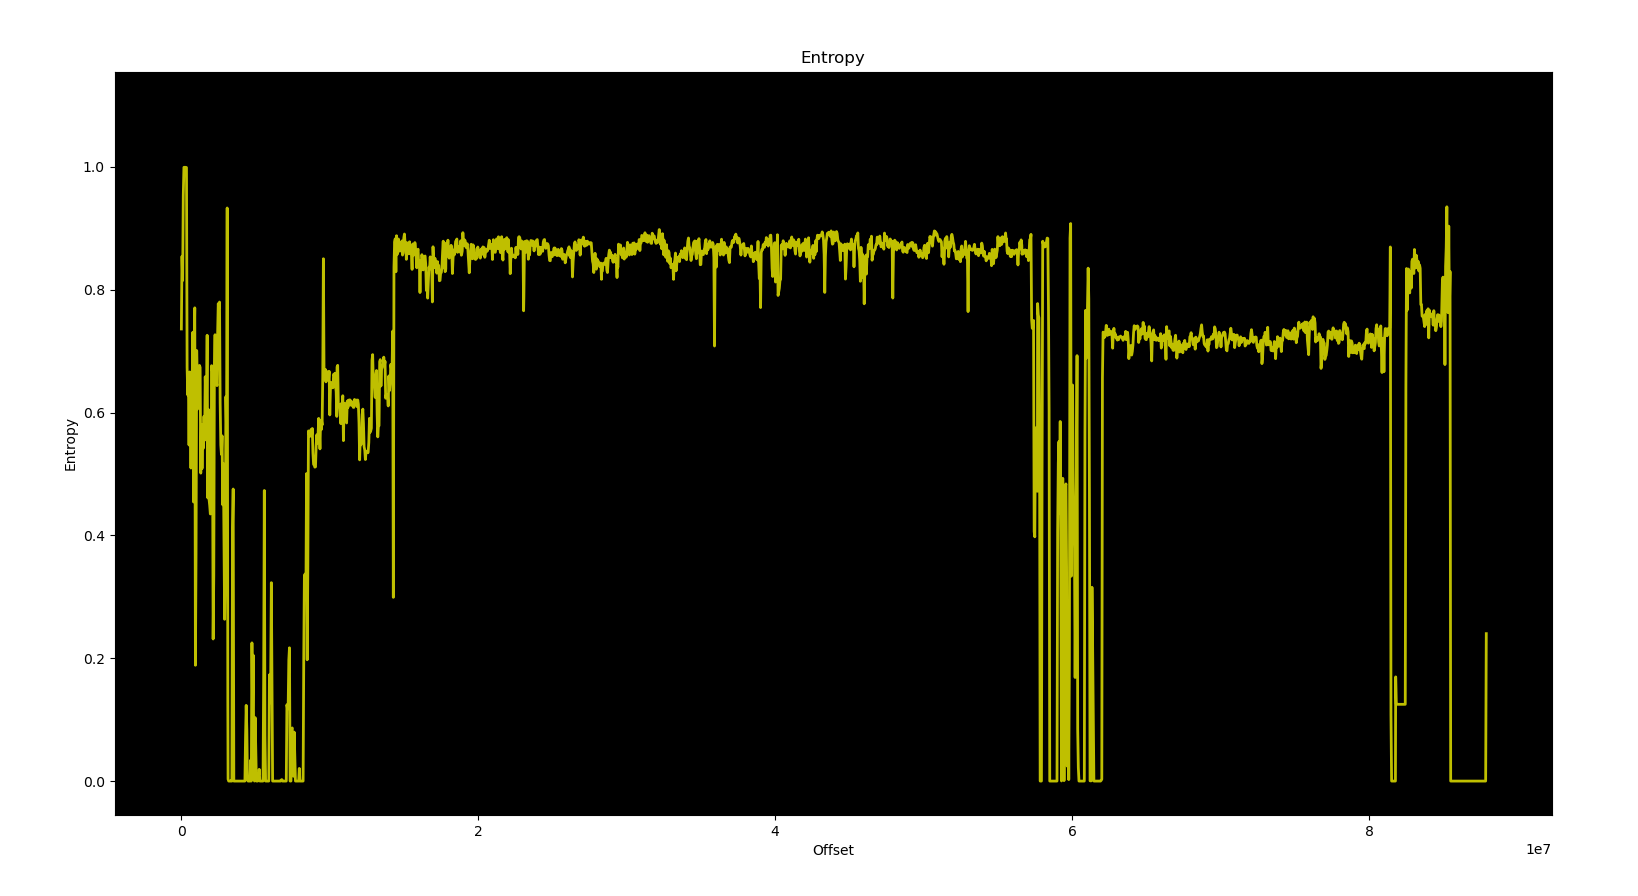
It is so surprisingly identical that you have to squint to spot the differences. There is no data hiding or obfuscation going on — it’s just structured differently.
Closing note
The Pixel 9 baseband is yet another reminder that nothing in this field stays still for long. The documentation is non-existent, the formats keep changing, and the only constant is the time wasted figuring out what broke this time. My new tool is far from well-tested, but it does help get the job done.
If you’re looking for closure, you won’t find it here — just more questions, and probably a few more CRC mismatches.
References
[1] Breaking Band talk
[2] A walk with Shannon talk
[3] Emulating Samsung’s Baseband for Security Testing talk
[4] Reversed BTL format structure
[5] Grant’s Ghidra reversing scripts and loader
[6] The vmlinux-to-elf source code
[7] My radio-to-elf source code
[8] How to Hack Shannon Baseband (from a Phone) talk
[9] ARM developer documentation covering MPU_RASR
[10] Alexander Pick’s modem extraction guide for older pixel phones
[11] The CalyxOS version of fbpacktool
[12] Google’s Android Binary Transparency project (my ass)
[13] One tar file format guide
[14] Another tar file format guide
[15] Linux kernel ext4 superblock structure
[16] Recent Google Pixel 9 security hardening